


CSS (Cascading Style Sheets) is a language that describes the presentation of the document which is written in HTML. The most important part to learn in CSS is selectors. This article will be focusing on the selectors.
In CSS, the selectors are used to target the HTML elements in the webpage that we want to style. There are a wide variety of CSS selectors available, allowing for fine-grained precision when selecting elements to style.
What is Selector?
A selector is the first part of the CSS. It is a pattern or rule of elements that tells the browser which HTML element should be selected to have CSS property values applied to them. The element or elements which are selected by the selector are referred to as the subject of the selector.
Let's see the types of selectors in CSS.
Types of Selectors
There are different types of selectors in CSS and knowing which type of selectors you might need will help you to get the job done.
- Universal Selectors
- individual Selectors
- Class And Id Selectors
- And Selectors (Chained)
- Combined Selector
- Inside and element
- Direct Child
- Sibling ~ or +
- Psuedo Classes.
Universal Selector
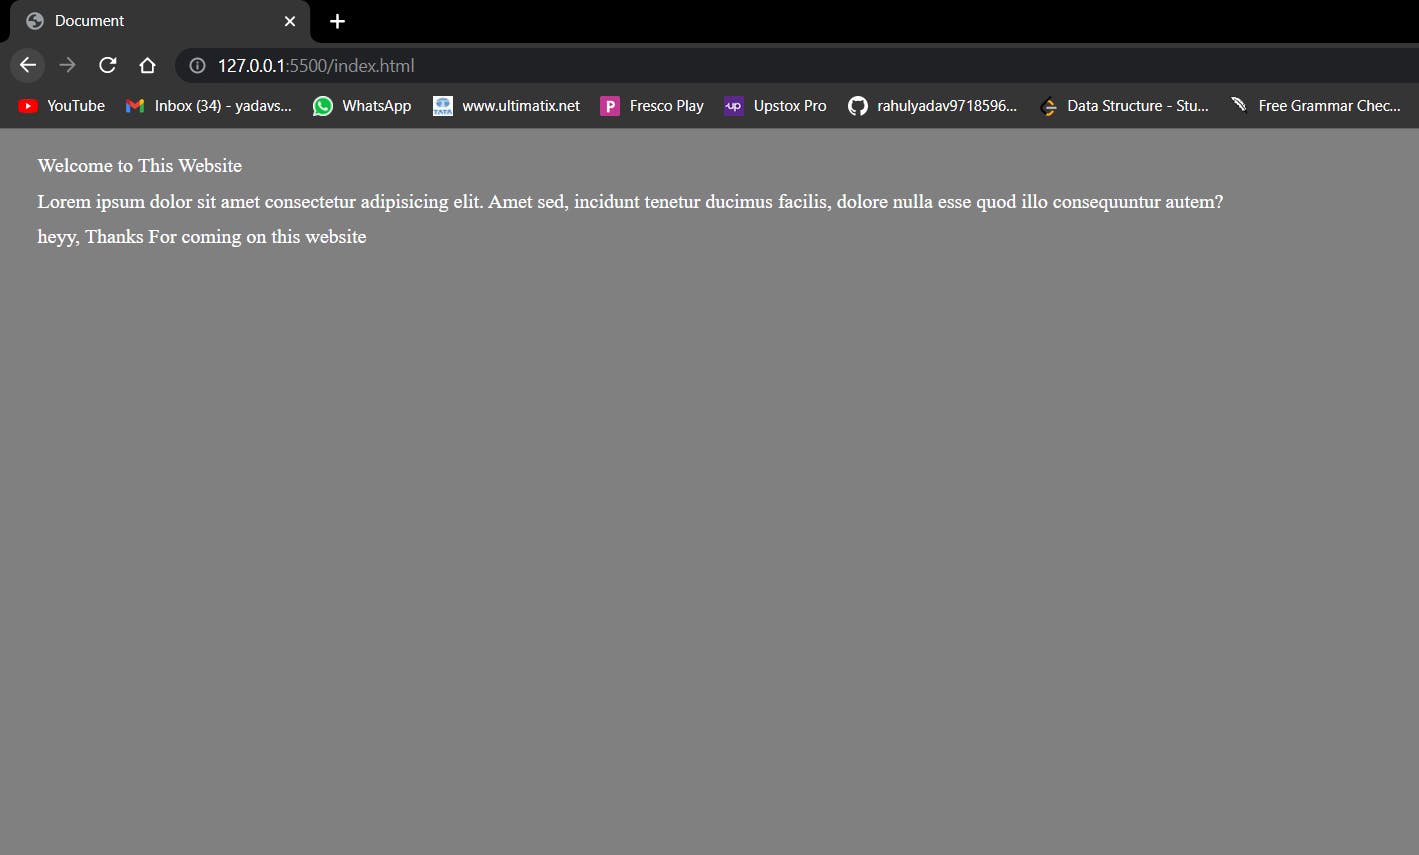
A universal selector is a selector which applies to the entire webpage. These are basically used to apply the properties to the entire webpage so that we don't need to apply them multiple times. Universal Selector is denoted by asterisk (*)
<html>
  <head>
    <title>Document</title>
    <style>
      /* universal selector */
      * {
        background-color: grey;
        color: #ffffff;
        margin: 10px;
      }
    </style>
  </head>
  <body>
    <div>Welcome to This Website</div>
    <span>Lorem ipsum dolor sit amet consectetur adipisicing elit. Amet sed,
      incidunt tenetur ducimus facilis, dolore nulla esse quod illo consequuntur
      autem?</span>
    <p>heyy, Thanks For coming on this website</p>
  </body>
</html>
Output:
Individual Selector
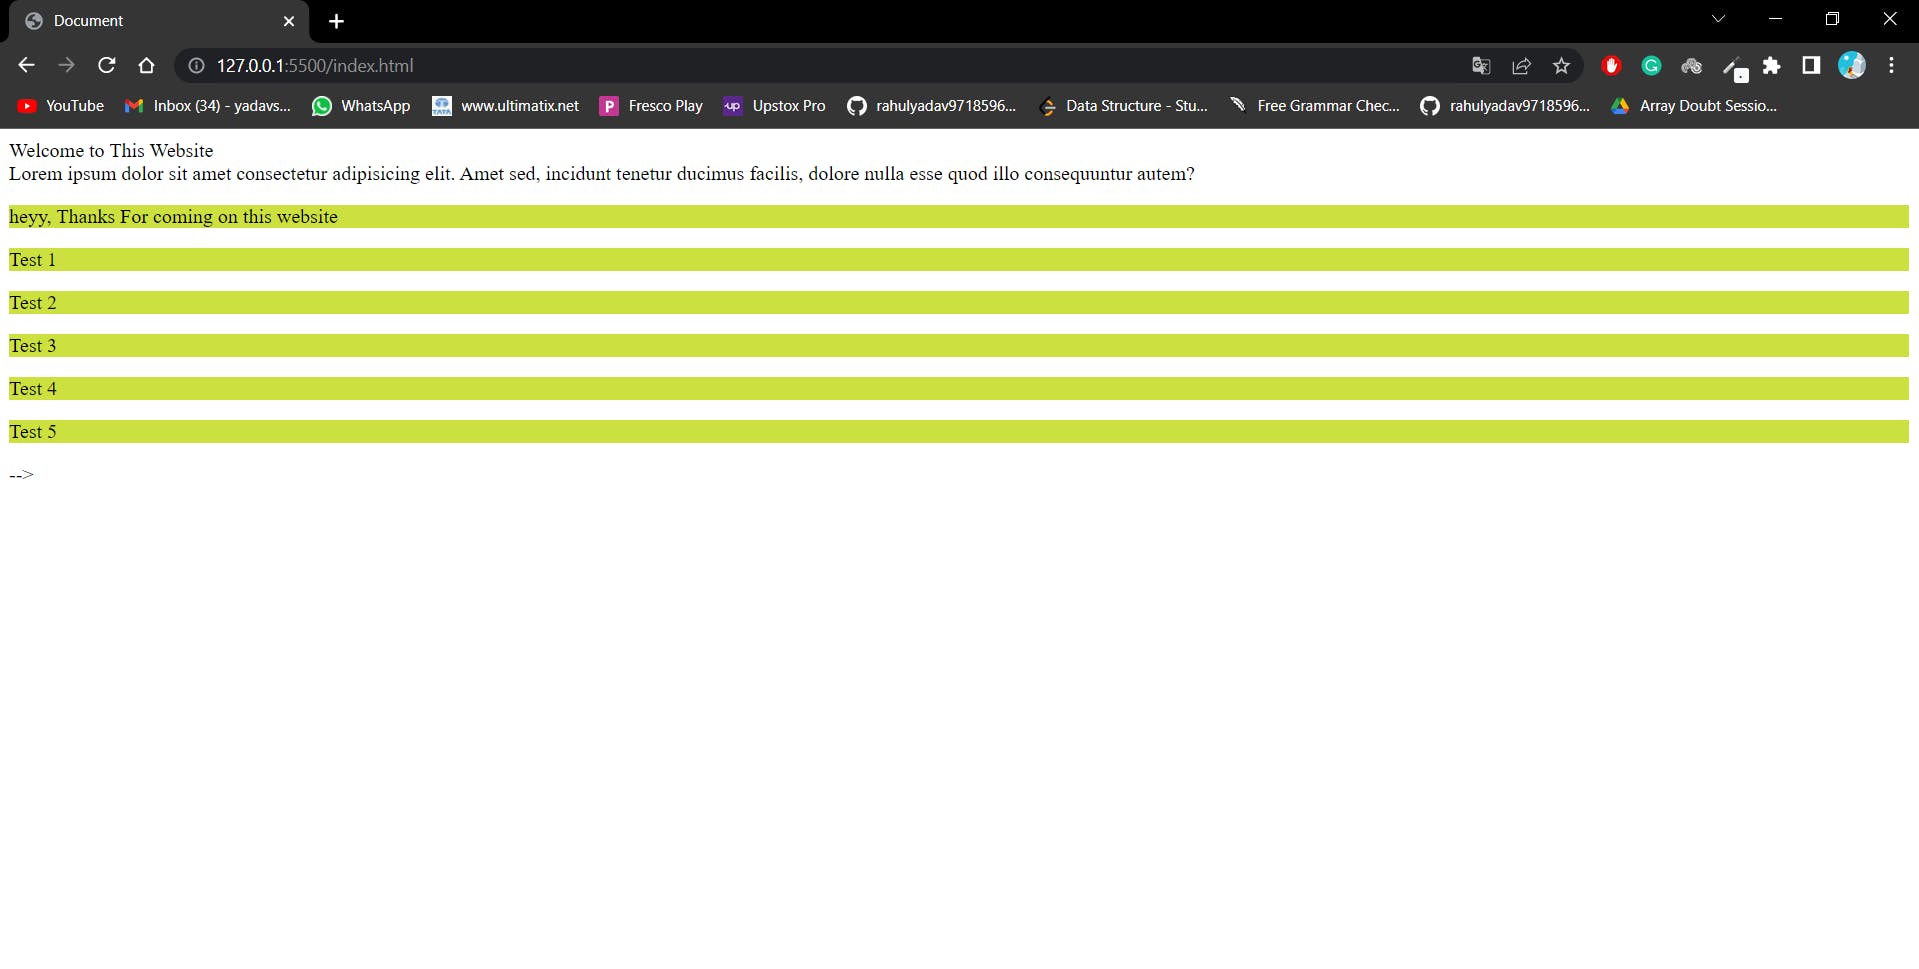
An individual selector is a selector which selects one element and we can apply the properties to it. Applying the properties to an element can make applying the properties to all similar elements which are present on the page. For example. We can see that applying properties to paragraph tags applies all the properties to all the paragraph tags which are present on the page.
<html>
  <head>
    <title>Document</title>
    <style>
      /* individual selector */
      p {
        background-color: rgb(204, 225, 63);
      }
    </style>
  </head>
  <body>
    <div>Welcome to This Website</div>
    <span>Lorem ipsum dolor sit amet consectetur adipisicing elit. Amet sed,
      incidunt tenetur ducimus facilis, dolore nulla esse quod illo consequuntur
      autem?</span>
     <p>heyy, Thanks For coming on this website</p>
    <section>
      <p class="sibling">Test 1</p>
      <p>Test 2</p>
      <p>Test 3</p>
      <p class="sibling">Test 4</p>
      <p>Test 5</p>
    </section> -->
  </body>
</html>
Output:
Class and Id Selector
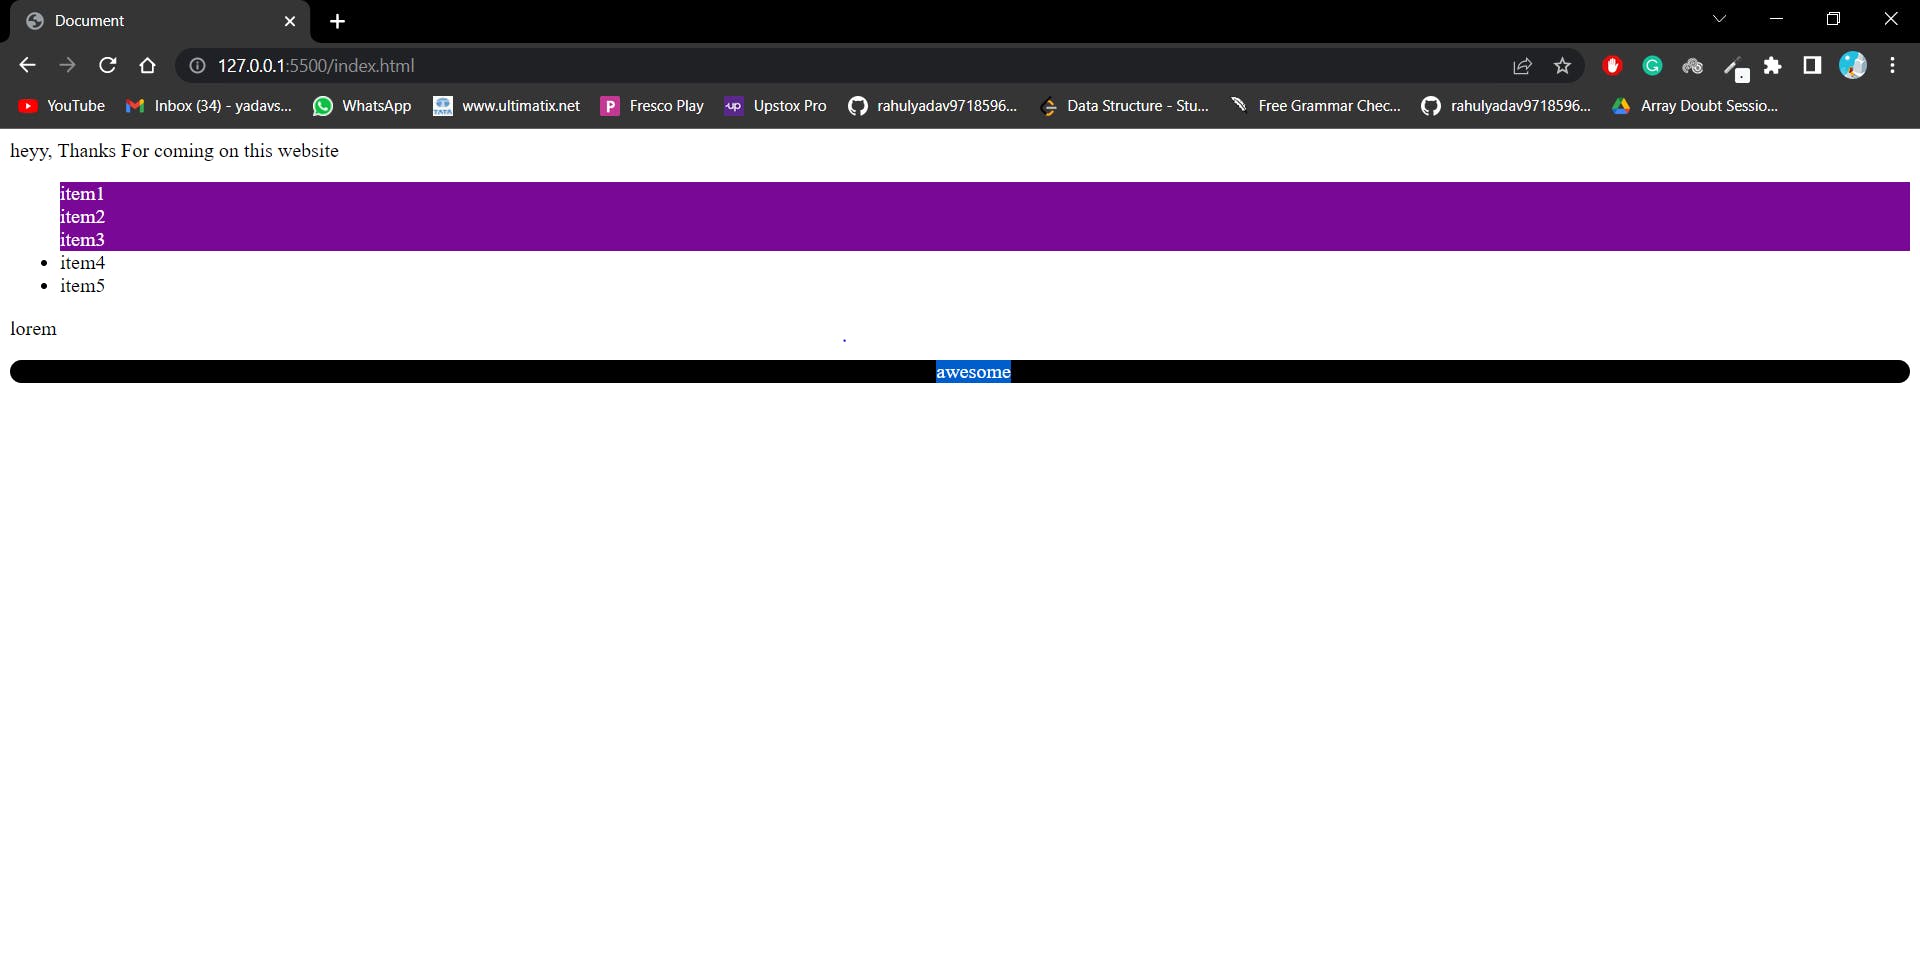
This selector is widely used when it comes to the styling of the webpage. Using a class and Id selector we can apply the property to a particular section or a particular element. Unlike individual selectors, it will only apply the property to the element which has the same class name or an Id name. The question arises if both class and id are doing the same work then why do we have two different things? So basically, class is an attribute that can be reused in the webpage, whereas the Id is used to uniquely identify the element in a webpage, Id can be unique in a webpage. for selecting the class we use a dot followed by the class name (for example .btn-primary) and for selecting Id we use # followed by the Id name (for example #btnId)
<html>
  <head>
    <title>Document</title>
    <style>
      /* class and id selector */
      .bg-black {
        background-color: rgb(122, 8, 150);
        color: #ffffff;
      }
      #Awesom {
        background-color: black;
        text-align: center;
        text-decoration: solid;
        border-radius: 30px;
      }
    </style>
  </head>
  <body>

     <p>heyy, Thanks For coming on this website</p>
    <ul>
      <li class="bg-black text-white">item1</li>
      <li class="bg-black">item2</li>
      <li class="bg-black" id="item3">item3</li>
      <li>item4</li>
      <li>item5</li>
    </ul>

    <div>
      <p>lorem</p>
      <li id="Awesom">awesome</li>
    </div>
  </body>
</html>
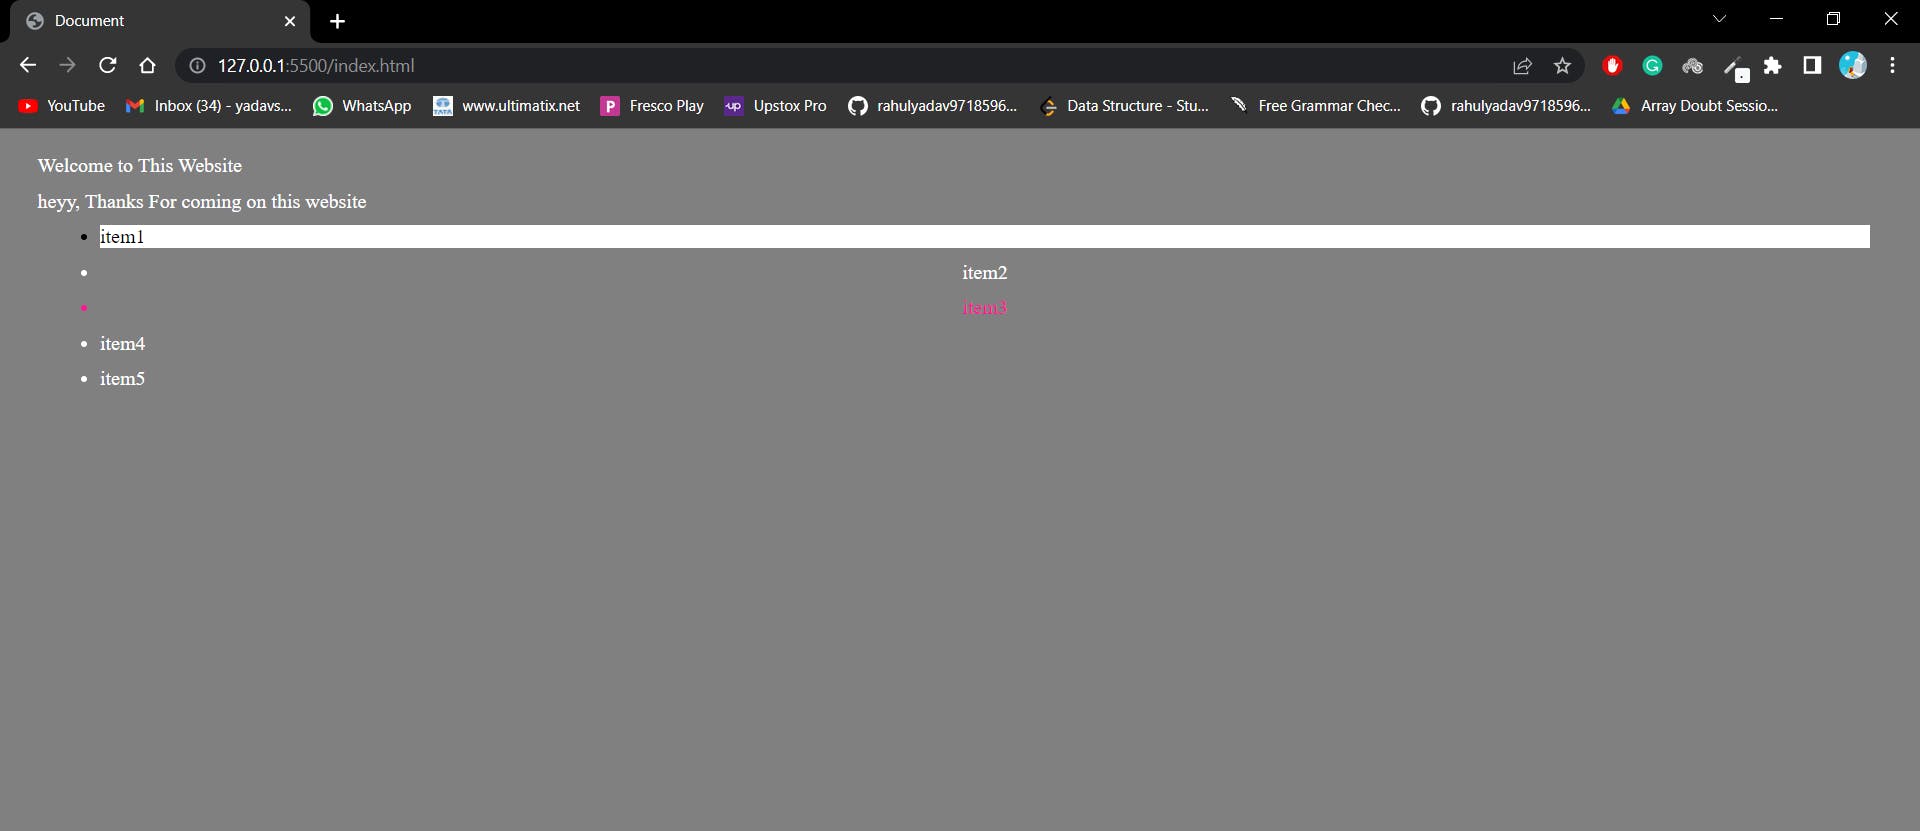
And Selector (Chained)
if we want to apply the property to a particular element then this chained selector is used. For example. we have the class name bg-black, which is present multiple times on the webpage, but we want to apply a property to that element that has the class name bg-black and text-white. Let's see in the code.
<html>
  <head>
    <title>Document</title>
    <style>

      /* and selector (chained) */
      /* So we have two classes named as bg-black but we want to give properties to those which are having the text-white also */
      li.bg-black.text-white {
        background-color: #fff;
        color: black;
        text-align: left;
      }
      /* we can also write like
      .bg-black.text-white */
      .bg-black {
        text-align: center;
      }
      .bg-black#item3 {
        color: deeppink;
      }
    </style>
  </head>
  <body>
    <div>Welcome to This Website</div>
     <p>heyy, Thanks For coming on this website</p>
    <ul>
      <li class="bg-black text-white">item1</li>
      <li class="bg-black">item2</li>
      <li class="bg-black" id="item3">item3</li>
      <li>item4</li>
      <li>item5</li>
    </ul>
  </body>
</html>
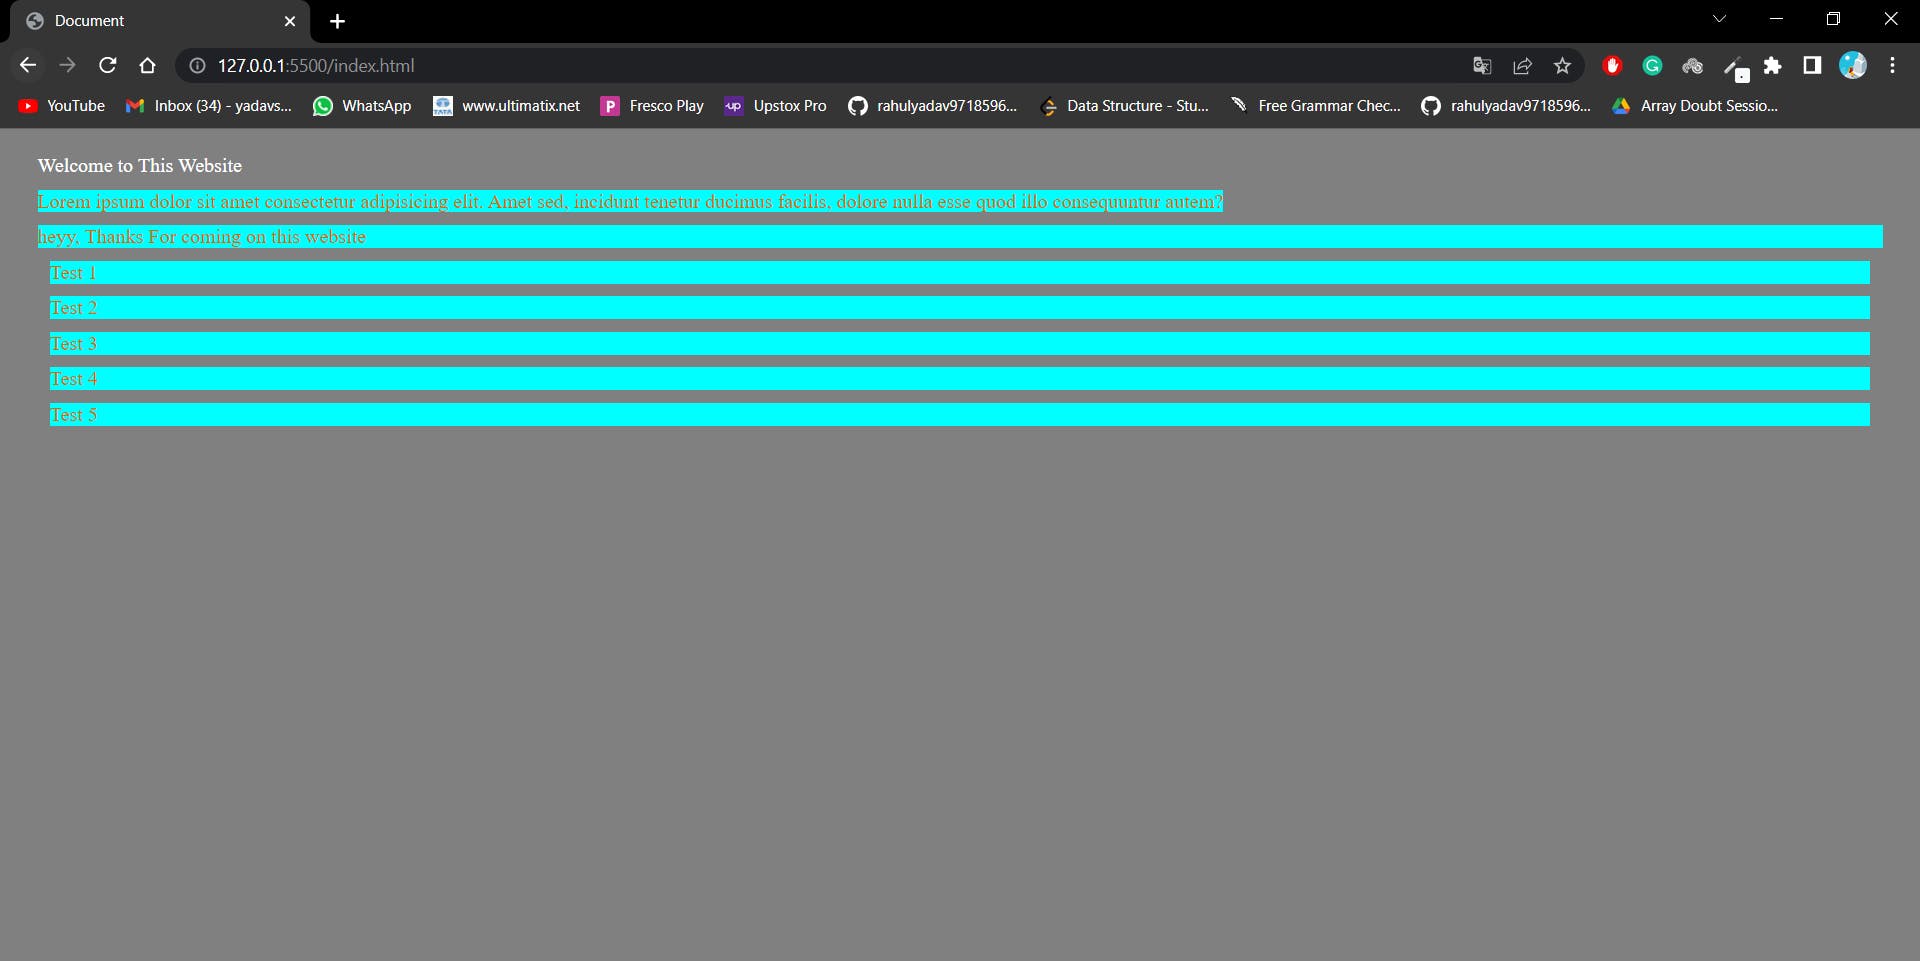
Combined Selector
Sometimes we need to apply the property to different elements in the document. At that time we use a combined selector. Just add a comma (, ) to separate the element to apply the property.
<html>
  <head>
    <title>Document</title>
    <style>
      /* universal selector */
      * {
        background-color: grey;
        color: #ffffff;
        margin: 10px;
      }
      /* combined selector */
      span,
      p {
        background-color: aqua;
        color: rgb(212, 106, 0);
      }
    </style>
  </head>
  <body>
    <div>Welcome to This Website</div>
    <span>Lorem ipsum dolor sit amet consectetur adipisicing elit. Amet sed,
      incidunt tenetur ducimus facilis, dolore nulla esse quod illo consequuntur
      autem?</span>
     <p>heyy, Thanks For coming on this website</p>
    <section>
      <p class="sibling">Test 1</p>
      <p>Test 2</p>
      <p>Test 3</p>
      <p class="sibling">Test 4</p>
      <p>Test 5</p>
    </section>
  </body>
</html>
We can see in the code we have applied property to both span and p tag which is separated by a comma.
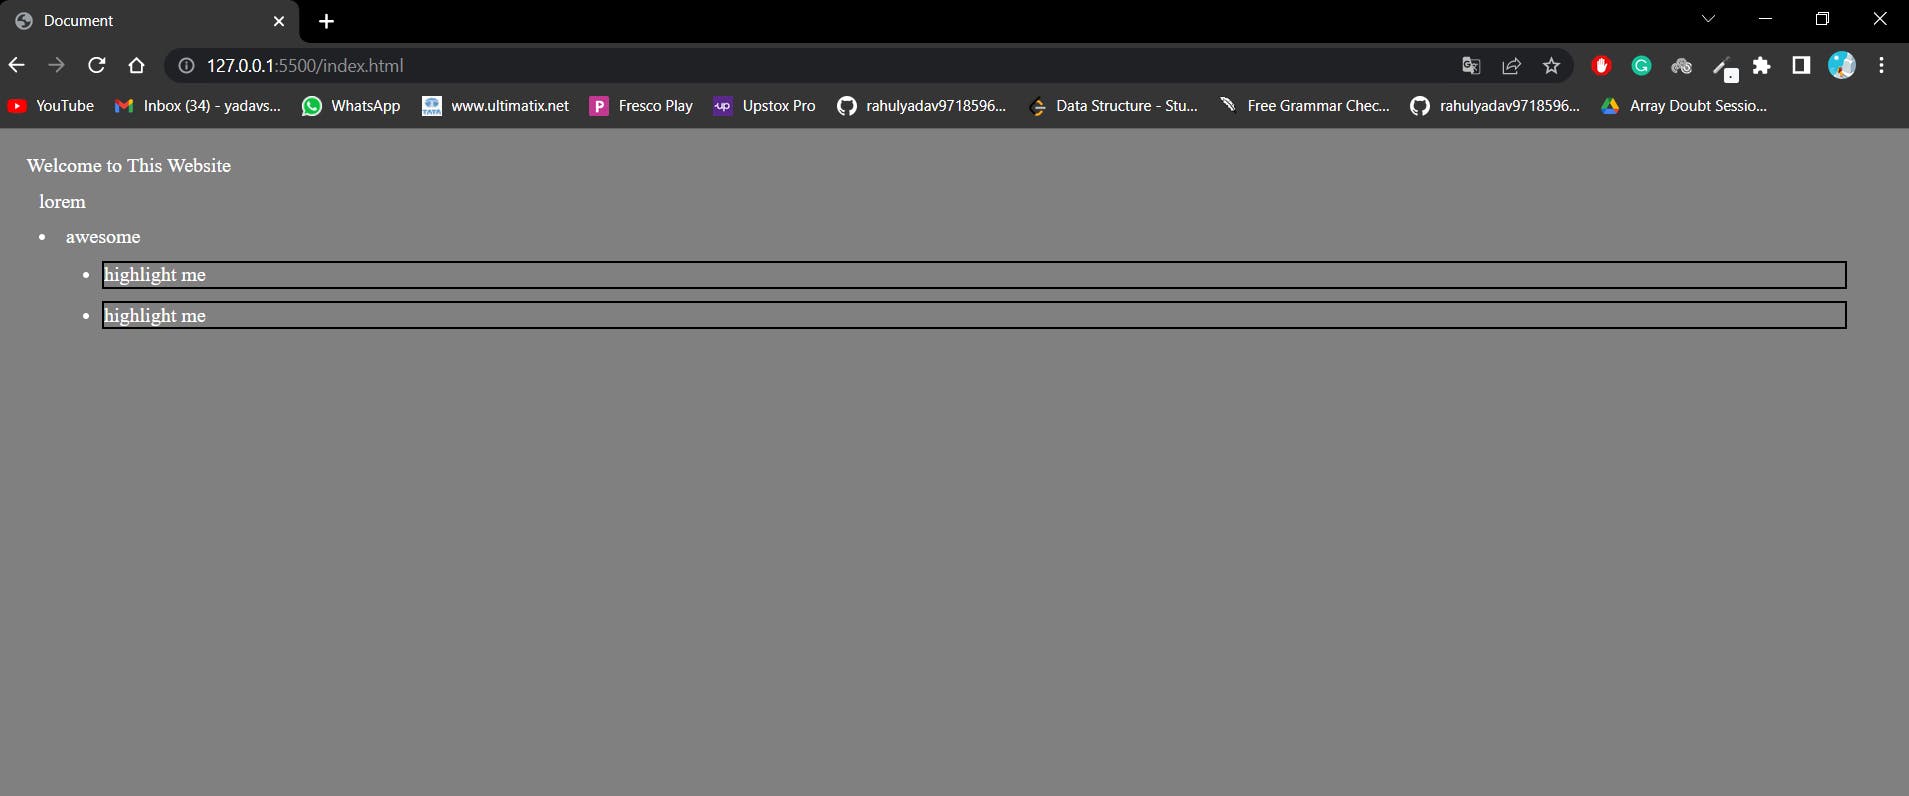
Inside an element
When we want to apply the property to the element which is present inside the class we will apply the inside an element property to it. For example, we need to apply the property to li which is present inside ul and the ul is present inside the div. Let's see in the code.
<html>
  <head>
    <title>Document</title>
    <style>
      /* universal selector */
      * {
        background-color: grey;
        color: #ffffff;
        margin: 10px;
      }
      /* inside an element */
      div ul li {
        color: #fff;
        border: 2px solid black;
        align-items: baseline;
      }
      /* We can also write like div>ul>li */
    </style>
  </head>
  <body>
    <div>Welcome to This Website</div>
    <div>
      <p>lorem</p>
      <li id="Awesom">awesome</li>
      <ul>
        <li>highlight me</li>
        <li>highlight me</li>
      </ul>
    </div>

  </body>
</html>
we can see we have applied the border to the li items in the output.
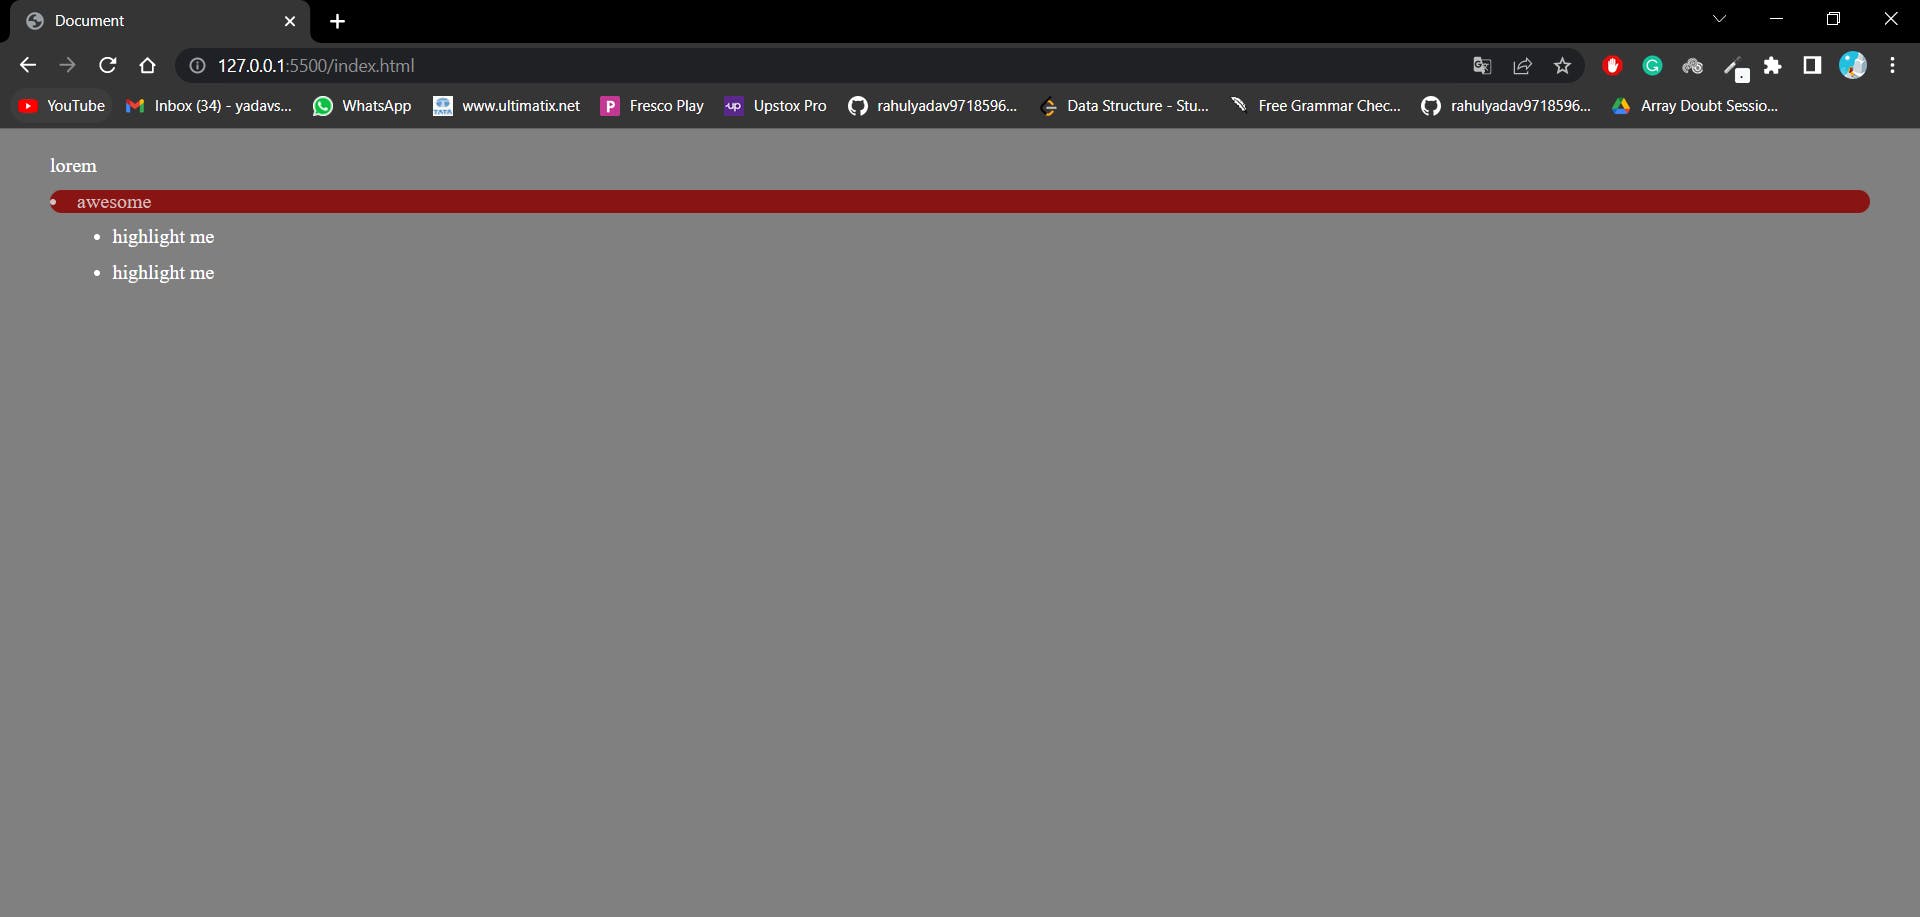
Direct Child
Whenever we need to apply the property to the element which is just inside another element we apply the direct child. The direct child is a child which has a parent to it. We use the > symbol to apply this property. For example, we need to apply the background color to the li which is preset inside the div will use div > li here.
<html>
  <head>
    <title>Document</title>
    <style>
      /* universal selector */
      * {
        background-color: grey;
        color: #ffffff;
        margin: 10px;
      }
      /* direct child */
      div > li {
        background-color: rgb(137, 20, 20);
        color: rgb(210, 191, 191);
        border-radius: 50px;
      }
    </style>
  </head>
  <body>

    <div>
      <p>lorem</p>
      <li id="Awesom">awesome</li>
      <ul>
        <li>highlight me</li>
        <li>highlight me</li>
      </ul>
    </div>
  </body>
</html>
we can see to li the background color and border radius are applied.
Sibling ~ or +
this is not a widely used selector in CSS but sometimes it comes in handy when you want to apply the property to the next element. For example, I want to apply the property to the paragraph element which is present just below the sibling class. Let's see in the code.
<html>
  <head>
    <title>Document</title>
    <style>
      /* universal selector */
      * {
        background-color: grey;
        color: #ffffff;
        margin: 10px;
      }
      /* sibling  ~ or + */
      .sibling + p {
        background-color: rgb(167, 30, 30);
      }
    </style>
  </head>
  <body>
    <div>Welcome to This Website</div>
    <section>
      <p class="sibling">Test 1</p>
      <p>Test 2</p>
      <p>Test 3</p>
      <p class="sibling">Test 4</p>
      <p>Test 5</p>
    </section>
  </body>
</html>
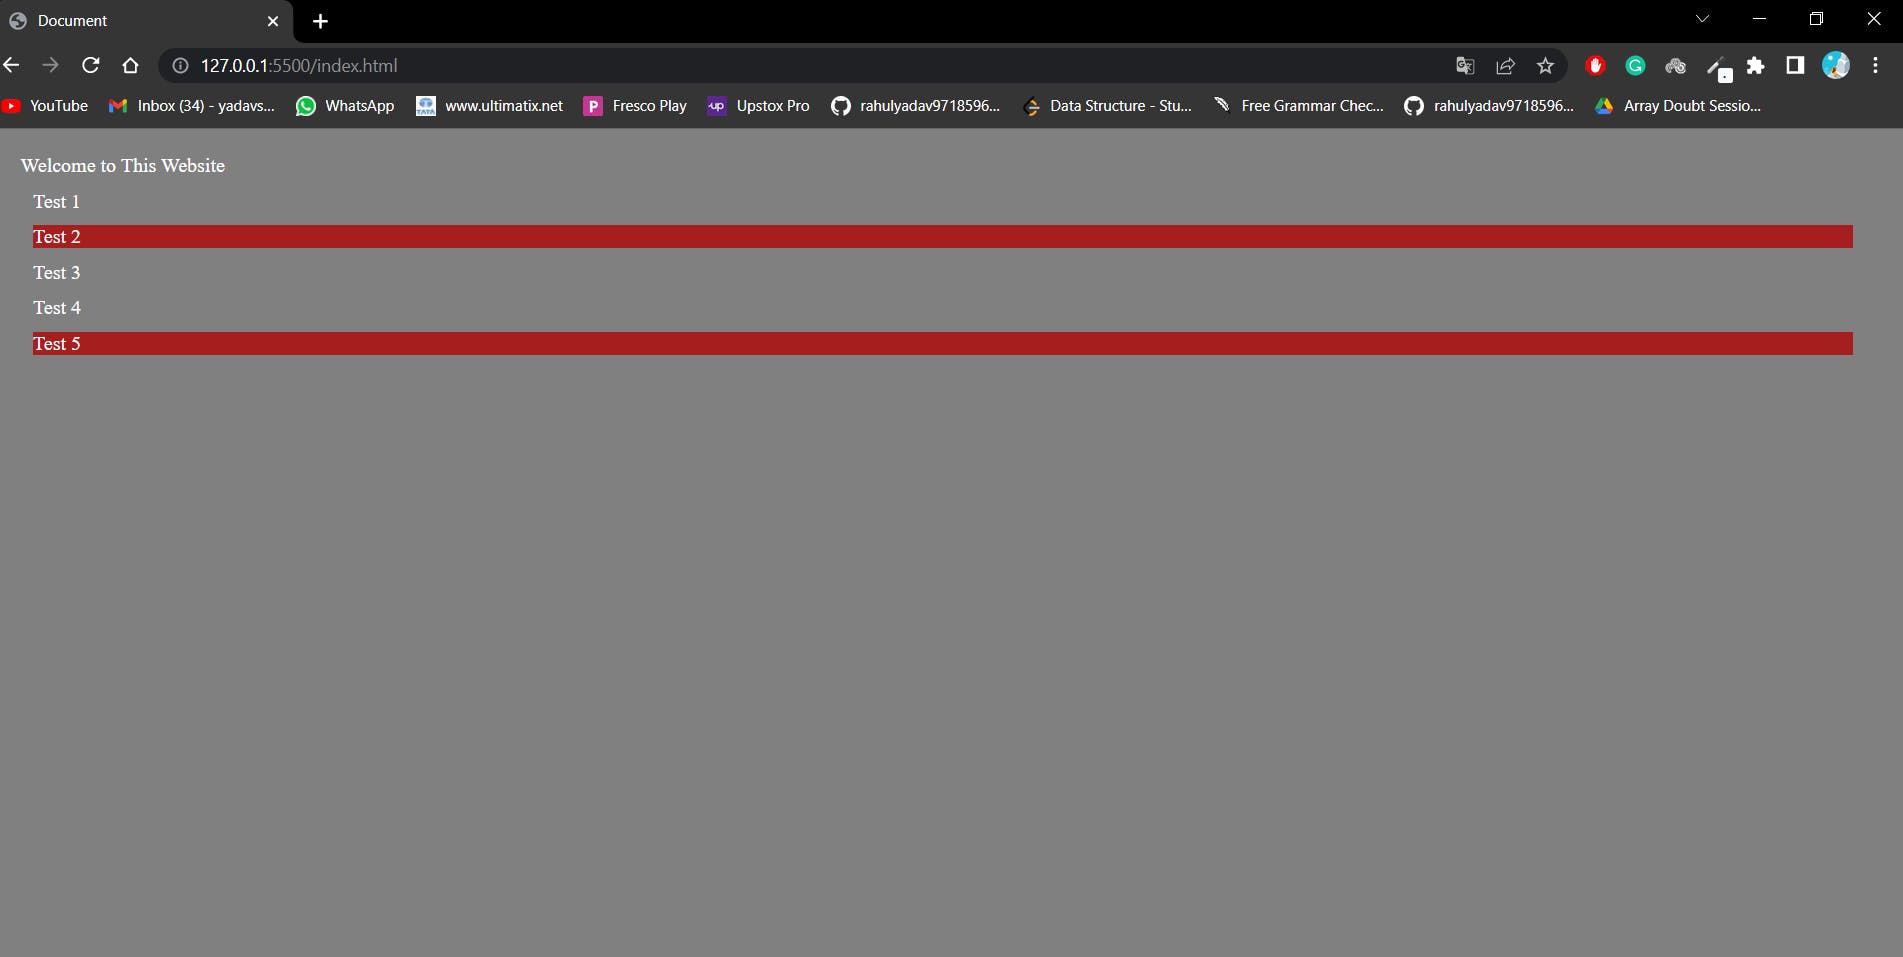
We can see that the background color is applied to paragraph Test 2 and paragraph Test 5 which are present just below the sibling class.
We will look into the depth of the Pseudo-classes in the next Article. Thanks for reading.